COMPLETED: 108 GOAL: 649?

Materials: white, green and a little bit of black
yarn, red felt, black permanent marker, crochet hook 'F', polyfil, craft glue
Head/body:
With white, 6 sc in magic circle (6)
Row 1: 2 sc around (12)
Row 2: sc, 2 sc, around (18)
Row 3: sc next 2, 2 sc, around (24)
Row 4: sc next 3, 2 sc, around (30)
Row 5: sc next 4, 2 sc, around (36)
Row 6-12: sc around (36)
Row 13: *sc next 10, dec* 3 times (33)
Row 14: *sc next 9, dec* 3 times (30)
Row 15: *sc next 8, dec* 3 times (27)
Row 16: *sc next 8, 2 sc* 3 times (30)
Row 17: *sc next 9, 2 sc* 3 times (33)
Row 18: sc around (33)
Row 19: *sc next 10, 2 sc* 3 times (36)
Row 20-21: sc around (36)
Row 22: sc next 5, 2 sc, around (42)
Row 23-24: sc around (42)
Row 25: sc next 6, 2sc, around (48)
Row 26-27: sc around (48)
You will be making the legs.
Row 28: sc next 12 (place marker in last sc), skip next 24,
join at next st with sl st, sc in same st, sc next 11 (24)
Row 29: sc next 2, dec, around (18)
Row 30: sc, dec, around (12)
Row 31: dec, around (6)
FO Weave tail between
loops and pull closed.
Stuff the head/body if you haven't started yet.
Row 28: join in st next to marker with sl st, sc in same st,
sc next 23 (24)
Row 29: sc next 2, dec, around (18)
Row 30: sc, dec, around (12)
Row 31: dec, around (6)
FO Weave tail between
loops and pull closed

Arms: (make 2)
With white, 6 sc in magic circle (6)
Row 1: sc, 2 sc, around (9)
Row 2: sc next 2, 2 sc around (12)
Row 3: sc around (12)
Row 4: sc next 2, dec, around (9)
Row 5-6: sc around (9)
Row 7: 2 sc, sc next 2, sl st, dec, sl st, sc next 2 (9)
Row 8: 2 sc, sc next 2, sl st, dec, sl st, sc next 2 (9)
Row 9: sc around (9)
Row 10: sc next 3, dec, sc next 3 (7)
Row 11: sc next 2, dec, sc next 3 (6)
Row 12: sc around (6)
Row 13: sc next 2, dec, sc next 2 (5)
Row 14-17: sc around (5)
FO
Stuff the arm.
Mitten: (make 2)
With green, 6 sc in magic circle (6)
Row 1: sc, 2 sc, around (9)
Row 2: sc next 2, 2 sc around (12)
Row 3: sc next 3, 2 sc, around (15)
Row 4: sc next 3, dec, around (12)
Row 5: sc around (12)
Row 6: *sl st, 2 dc, sl st* repeat 4 times (12)
FO
Slip mitten over ends of arms and secure.
Spikes: (make 6)
With green, 4 sc in magic circle (4)
Row 1: sc around (4)
Row 2: sc, dec, sc (3)
Row 3: sc, dec (2)
Row 4: dec (1)
FO
Sew three spikes on the top of each mitten. Sew completed
arms to body, just below the neck line.
Front Arm Fur: (make 2)
With white, ch 4, turn
Row 1: sc 2nd ch from hook and next 2, ch 5, sc 2nd ch from
hook and next 3, ch 5, sc in 2nd ch from hook and next 3, ch 3, sc 2nd ch from
hook and next
FO Weave tail along
the top and tighten to give the look of layers.
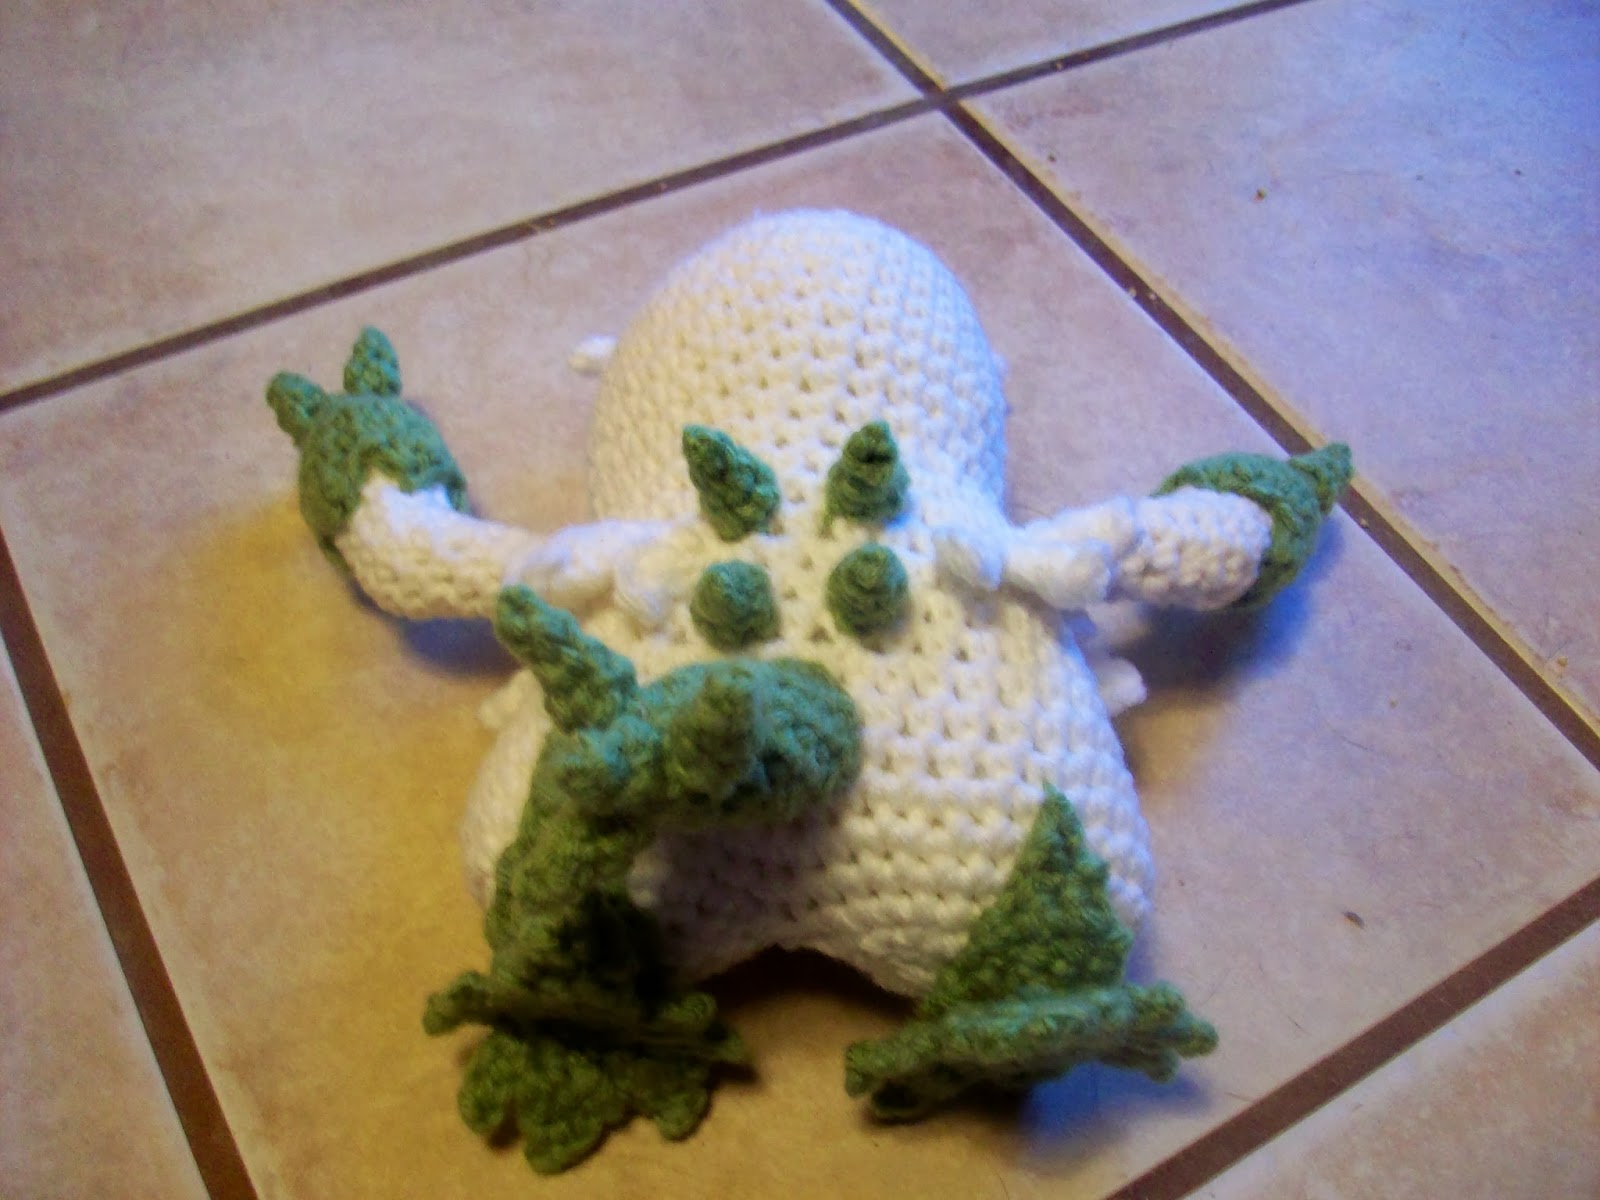
Sew each piece next to the arms at a slight angle downward.
Two on the front, two on the back. See picture for placement.
Back Arm Fur: (make 2)
With white, ch 4, turn
Row 1: sc 2nd ch from hook and next 2, ch 5, sc 2nd ch from hook and next 3, ch 5, sc in 2nd ch from hook and next 3, ch 4, sc 2nd ch from hook and next 2, ch 3, sc 2nd ch from hook and next
FO Weave tail along the top and tighten to give the look of layers.
Sew each piece next to the arms at a slight angle downward. Two on the front, two on the back. See picture for placement.
Feet:
Triangles: (make 4)
With green, ch 7, turn
Row 1: sc 2nd ch from hook and next 5, ch 1, turn (6)
Row 2: skip 1st sc, sc next 5, ch 1, turn (5)
Row 3: skip 1st sc, sc next 4, ch 1, turn (4)
Row 4: skip 1st sc, sc next 3, ch 1, turn (3)
Row 5: skip 1st sc, sc next 2, ch 1, turn (2)
Row 6: dec (1)
FO
Bottom: (make 2)(you will be starting and stopping
forming various sized triangles-eight total, as you make your way around the
circle)
With green, 6 sc in magic circle (6)
Row 1: 2 sc, around (12)
Row 2: sc next 3, 2 sc, around (15)
Row 3: sc next 2 (place marker), ch 1, turn (2)
Row 4: sc next 2, ch 1, turn (2)
Row 5: dec, ch 1, turn (1)
Row 6: sc (1)
FO
Row 3: join at marker with sl st, sc next 2 (place marker),
ch 1, turn (3)
Row 4: sc next 2, ch 1, turn (2)
Row 5: dec, ch 1, turn (1)
Row 6: sc, (1)
FO
Row 3: join at marker with sl st, sc next 2 (place marker),
ch 1, turn (3)
Row 4: sc next 2, ch 1, turn (2)
Row 5: dec, ch 1, turn (1)
Row 6: sc, (1)
FO
Row 3: join at marker with sl st, ch 2, dc (place marker)
(1)
FO
Row 3: join at marker with sl st, ch 1, sc (place marker)
(1)
FO
Row 3:Join at marker with sl st, sc next 5 (place marker),
ch 1, turn (5)
Row 4: skip 1st sc, sc next 4, ch 1, turn (4)
Row 5: skip 1 st sc, sc next 3, ch 1, turn (3)
Row 6: skip 1 st sc, sc next 2, ch 1, turn (2)
Row 7: dec, ch 1, turn (1)
Row 8: sc (1)
FO
Row 3: join at marker with sl st, ch 1, sc (place marker)
(1)
FO
Row 3: join at marker with sl st, ch 2, dc (place marker)
(1)
FO
Row 3: join at marker with sl st, sc next 2, ch 1, turn (2)
Row 4: sc next 2, ch 1, turn (2)
Row 5: dec, ch 1, turn (1)
Row 6: sc (1)
FO
Each foot has one bottom piece and two triangles. Place the
bottom piece on the leg with the three same sized triangles facing the front.
See picture. Secure. Take one of the triangles and place it on the front of the
leg with the base next to the bottom piece. Secure. Take the second triangle
and place it on the back of the leg, arrange and secure as you did for the
front.

Beard:
With white, ch 6, turn
Row 1: sc in 2nd ch from hook and next 4, *ch 7, sc 2nd ch
from hook and next 4* repeat 5 times.
FO
Sew beard to face in a half circle shape.
Eyebrows: (make 2)
With white, ch 4, turn
Row 1: sc 2nd ch from hook and next 2, ch 1, turn (3)
Row 2: sc next 2, sl st next, ch 1, turn (3)
Row 3: skip 1st st, sc next 2, ch 1, turn (2)
Row 4: sc next 2, ch 3, turn (2)
Row 5: sc 2nd ch from hook and next sc, sc in 1st st in row
4, ch 3, sc 2nd ch from hook and next, sc in next st in row 4, ch 4, sc in 2nd
ch from next and next 2, sl st in base of ch (this will be the outside of the
eyebrow)
FO
Sew eyebrows to face close together. See picture for
placement.
Back Spikes: (make 4)
With green, 4 sc in magic circle (4)
Row 1: sc around (4)
Row 2: sc, dec, sc (3)
Row 3: sc, dec (2)
Row 4: dec (1)
FO
Sew to back, between back fur.
Tail:
With green, 9 sc in magic circle (9)
Row 1-6: sc around (9)
Row 7: sc next 2, dec, sc next 2, dec, sc (7)
Row 8: sc, dec, sc next 2, dec (5)
Row 9: sc, dec, sc next 2 (4)
Row 10: dec, dec (2)
Row 11: dec (1)
FO
Tail Spikes: (make 3)
Sew tail spikes to end of tail. Sew assembled tail to body.

Sew to back, between back fur.
Tail:
With green, 9 sc in magic circle (9)
Row 1-6: sc around (9)
Row 7: sc next 2, dec, sc next 2, dec, sc (7)
Row 8: sc, dec, sc next 2, dec (5)
Row 9: sc, dec, sc next 2 (4)
Row 10: dec, dec (2)
Row 11: dec (1)
FO
Tail Spikes: (make 3)
With green, 4 sc in magic circle (4)
Row 1: sc around (4)
Row 2: sc, dec, sc (3)
Row 3: sc, dec (2)
Row 4: dec (1)
FO
Sew tail spikes to end of tail. Sew assembled tail to body.
Finish: Cut two small half circles out of the red
felt for eyes. Using the black marker make a small pupil in the center of each
eye. Glue to face under the eyebrows. They point downward giving Abomasnow an
angry look. Embroider two small lines on his forehead with black yarn to finish
up.
Abomasnow and Pokemon © Nintendo
This is my own original pattern. Please do not sell this pattern or the products created from this pattern. Please do not modify my pattern and call it your own. If you would like to place my pattern on another site, please feel free to provide a link.
Abomasnow and Pokemon © Nintendo


