Thursday, September 19, 2013

Weepinbell

COMPLETED: 99 GOAL:649?


Materials: light yellow, light green, pink, brown and black yarn, white and black felt, polyfil, crochet hook 'F', craft glue, cardboard, pipe cleaners


Body:
With yellow, 6 sc in magic circle (6)
Row 1: 2 sc around (12)
Row 2: sc next, 2 sc next, around (18)
Row 3-4: sc around (18)
Row 5: sc next, 2 sc next, around (27)
Row 6: sc next 2, 2 sc next, around (36)
Row 7-12: sc around (36)
Row 13: sc next 7, dec over next 2, around (32)
Row 14-26: sc around (32)
FO


Mouth: (keep track of what is the outside or the inside of piece with marker)
With black, 6 sc in magic circle (6)
Row 1: 2 sc around (12)
Row 2: sc next, 2 sc next, around (18)
Row 3: sc next 2, 2 sc next, around (24)
Row 4: sc next 3, 2 sc next, around (30)
Row 6-15: sc around (30)
Row 16: sc next 14, 2 sc next, around (32)
FO


Tongue:
With pink, 6 sc in magic circle (6)
Row 1: 2 sc, around (12)
Row 2: sc next, 2 sc next, around (18)
Row 3: 2 sc next 2, sl st next 7, 2 sc next 2, sl st next 7 (22)
Row 4: sc around (22)
FO


Sew the tongue on the inside of the mouth, just above row 15. The tongue is an oval shape, arrange it so the longer side is right to left, rather then front to back.


I cut a piece of cardboard the length and diameter of the body and put it inside. This is optional, if you would like a softer look for the body, you can just stuff it. Place enough stuffing inside for just the top portion. Slide the mouth inside the body matching the last rows. Add more stuffing or less depending on how you like it and then slide mouth back inside.


Lips:
Row 1:With pink, sc around last rows of mouth/body , making sure that you pick up both the black and yellow loops (32)
Row 2-10: sc around (32)
FO


Roll the lips towards the  back end of Weepinbell on the outside. Twist a couple of pipe cleaners together and insert them inside the lips. Sew last row of lips to row 1 of lips (where you change color from yellow to pink. Put a small amount of stuffing in lips as you sew. When complete bend the lips into the 'figure 8" shape.


Leaves: (make 2)
With green, 6 sc in magic circle (6)
Row 1: 2 sc around (12)
Row 2: sc next 3,2 sc next, around (15)
Row 3: sc around (15)
Row 4: sc next 4, 2 sc next, around (18)
Row 5: sc around (18)
Row 6: sc next 4, dec over next 2, around (15)
Row 7: sc next 2, dec over next 2, around (12)
Row 8: sc next  4, dec over next 2, around (10)
Row 9: sc around (10)
Row 10: sc next 3, dec over next 2, around (8)
Row 11: 2 sc next 2, sc next, *dec over next 2* twice, sc next (8)
Row 12: sc next 3, 2 sc next, *dec over next 2* twice (6)
Row 13: dec over next 2, 2 sc next, dec over next 2, sc next (5)
Row 14: sc next, *dec over next 2* twice (3)
Row 15: dec over next 2, sc next (2)
FO
 
Flatten and sew to sides of body.


Stem:
With brown, 8 sc in magic circle (8)
Row 1-6: sc around (8)
Row 7: sc next 2, dec over next 2, around (6)
Row 8-12 sc around (6)
Row 13: sc next, dec over next 2, around (4)
Row 14-15: sc around (4)
FO
 
 
Place a pipe cleaner inside stem and stuff before closing up the end and sew to top of body. ( I used one pipe cleaner and folded it up until it was the right size to fit inside.)


Finish: Cut two large circles out of white felt for eyes and two smaller circles out of black felt for pupils. Glue to face. Embroider three small dots just above eyes with the green yarn. 


Weepinbell and Pokemon © Nintendo
 

This is my own original pattern. Please do not sell this pattern or the products created from this pattern. Please do not modify my pattern and call it your own. If you would like to place my pattern on another site, please feel free to provide a link.


Wednesday, September 11, 2013

Happiny

COMPLETED: 98 GOAL: 649?


Materials: light pink, medium pink, white and black yarn, white and black felt, polyfil, crochet hook 'F', craft glue, black permanent marker


Body:
With light pink, 6 sc in magic circle (6)
Row 1: 2 sc around (12)
Row 2: sc next, 2 sc next, around (18)
Row 3: sc next 2, 2 sc next, around (24)
Row 4: sc next 3, 2 sc next, around (30)
Row 5: sc next 4, 2 sc next, around (36)
Row 6: sc next 5, 2 sc next, around (42)
Row 7: sc next 6, 2 sc next, around (48)
Row 8-14: sc around (48)
Row 15: sc next 6, dec over next 2, around (42)
Row 16: sc next 5 dec over next 2, around (36)
Row 17: sc around (36)
Row 18: sc next 4, dec over next 2, around (30)
Begin stuffing.
Row 19: sc around (30)
Row 20: sc next 3, dec over next 2, around (24)
row 21: sc around (24)
Row 22: sc next 2, dec over next 2, around (18)
Row 23: sc around (18)
Row 24: sc next, dec over next 2, around (12)
FO  Weave tail between loops and pull closed.


Pants: (you will be changing colors, you may want to join rows)
With medium pink, 8 sc in magic circle (8)
Row 1: 2 sc around (16)
Row 2: sc next, 2 sc next, around (24)
Row 3: sc next 2, 2 sc next, around (32)
Row 4: sc next 3, 2 sc next, around (40)
Row 5: sc next 4, 2 sc next, around (48)
Row 6: sc next 11, 2 sc next, around (52)
Row 7-10 sc around (52)
Row 11: change to white, sc around (52)
Row 12: sc around (52)
Row 13: sc next 11, dec over next 2, around (48)
Row 14-15: sc around (48)
FO  Fold row 15 inside and secure. Place pants on body.


Feet: (make 2)
With medium pink, 6 sc in magic circle (6)
Row 1: sc next 2, 2 sc next, around (8)
Row 2: sc next 3, 2 sc next, around (10)
Row 3: sc next 4, 2 sc next, around (12)
Row 4-8: sc around (12)
Row 9: dec over next 2, around (6)
FO  Weave tail between loops and pull closed. Flatten and sew to body.


Egg:
With white, 3 sc in magic circle (3)
Row 1: sc next, 21 sc next, sc next, around (4)
Row 2: sc next, 2 sc next, around (6)
Row 3: sc next 2, 2 sc next, around (8)
Row 4: sc around (8)
Row 5: sc next 2, dec over next 2, around (6)
Row 6: sc next, dec over next 2, around (4)
Row 7: dec over next 2, around (2)
FO 


Sew to body, just above top of pants. Stuff lightly as you go.


Arms: (make 2)
With light pink, 4 sc in magic circle (4)
Row 1: sc next, 2 sc next, around (6)
Row 2: sc next 2, 2 sc next, around (8)
Row 3: sc next 2, 2 sc next, around (10)
Row 4-5: sc around (10)
Row 6: dec over next 2, around (5)
FO  Flatten and sew end closed.


Position arms on body just above the top of the pants and sew to body.


Bangs: (made with popcorn stitch)
With light pink, ch 4
Row 1: 5 trc in 2nd ch from hook, yo and pull through all loops on hook, ch 1, repeat for next 2 ch (15)
FO  Sew to forehead.


Ball:
With medium pink, 6 sc in magic circle
Row 1: 2sc around (12)
Row 2: sc next 2, dec over next 2, around (9)
Row 3: sc around (9)
FO


Hair:
With light pink, 4 sc in magic circle (6)
Row 1: 2 sc, around (12)
Row 2: sc around (12)
Row 3: sc next 3, 2 sc next, around (15)
Row 4: sc around (15)
Row 5: sc next 4, 2 sc next, around (18)
Row 6-7: sc around (18)
Row 8: sc next 4, dec over next 2, around (15)
Row 9: sc around (15)
Row 10: sc next 3, dec over next 2, around (12)
Lightly stuff.
Row 11: sc next 2, dec over next 2, around (9)
Row 12: sc around (9)
Row 13: sc next 3, dec over next 2, sc next 4 (8)
Row 14: sc next 3, dec over next 2, sc next 3 (7)
Row 15: sc next 2, dec over next 2, sc next 3 (6)
FO


Turn tip to form swirl and secure. Sew hair to ball and then sew to body.


Cheeks: (make 2)
With medium pink, 6 sc in magic circle (6)
FO


Sew to body.


Finish: Cut two very small ovals out of white felt for eyes. Either cut two smaller ovals out of black felt for pupils or use the marker to draw on the pupils. Glue eyes to body. Embroider the mouth  on face with black yarn.


Happiny and Pokemon © Nintendo
 

This is my own original pattern. Please do not sell this pattern or the products created from this pattern. Please do not modify my pattern and call it your own. If you would like to place my pattern on another site, please feel free to provide a link.


Saturday, September 7, 2013

Chansey

COMPLETED: 97 GOAL: 649?


Materials: light pink, medium pink, white and black yarn, white and black felt, polyfil, crochet hook 'F', craft glue, black permanent marker


Body:
With light pink, 6 sc in magic circle (6)
Row 1: 2 sc around (12)
Row 2: sc next, 2 sc next, around (18)
Row 3: sc next 2, 2 sc next, around (24)
Row 4: sc next 3, 2 sc next, around (30)
Row 5: sc next 4, 2 sc next, around (36)
Row 6: sc next 5, 2 sc next, around (42)
Row 7: sc next 6, 2 sc next, around (48)
Row 8: sc next 7, 2 sc next, around (54)
Row 9-16: sc around (54)
Row 17: sc next 7, dec over next 2, around (48)
Row 18: sc next 6, dec over next 2, around (42)
Row 19: sc next 5 dec over next 2, around (36)
Row 20: sc around (36)
Row 21: sc next 4, dec over next 2, around (30)
Begin stuffing.
Row 22: sc around (30)
Row 23: sc next 3, dec over next 2, around (24)
row 24-25: sc around (24)
Row 26: sc next 2, dec over next 2, around (18)
Row 27: sc around (18)
Row 28: sc next, dec over next 2, around (12)
FO  Weave tail between loops and pull closed.


Feet: (make 2)
With medium pink, 6 sc in magic circle (6)
Row 1: sc next 2, 2 sc next, around (8)
Row 2: sc next 3, 2 sc next, around (10)
Row 3-11: sc around (10)
Row 12: dec over next 2, around (5)
FO  Weave tail between loops and pull closed. Flatten and sew to body.


Egg:
With white, 6 sc in magic circle (6)
Row 1: sc next, 2 sc next, around (9)
Row 2: sc next 2, 2 sc next, around (12)
Row 3: sc around (12)
Row 4: sc next 3, 2 sc next, around (15)
Row 5: sc next 4, 2 sc next, around (18)
Row 6-7: sc around (18)
Begin stuffing. But not to full, because the egg should be a little flat.
Row 8: sc next 3, dec over next 2, *sc next 2, dec over next 2* three times, sc next (14)
Row 9: sc next 2, dec over next 2,* sc next, dec over next 2* three times, sc next (10)
Row 10: sc next 3, dec over next 2, around (8)
FO  Weave tail between loops and pull closed.


Pouch:
With medium pink, ch 13
Row 1: sc 2nd ch from hook and next 11, ch 1, turn (12)
Row 2: sc across, ch 1, turn (12)
Row 3: skip 1st sc, sc next 9, dec over next 2, ch 1, turn (10)
Row 4: skip 1st sc, sc next 7, dec over next 2, ch 1, turn (8)
Row 5: dec over next 2, across, ch 1, turn (4)
Row 6: dec over next 2, across (2)
FO


Position egg on body and pin. Take pouch and place over lower part of egg and sew to body. Remove pin from egg and sew to body.


Arms: (make 2)
With light pink, 4 sc in magic circle (4)
Row 1: sc next, 2 sc next, around (6)
Row 2: sc next 2, 2 sc next, around (8)
Row 3: sc next 2, 2 sc next, around (10)
Row 4-5: sc around (10)
Row 6: dec over next 2, around (5)
FO  Flatten and sew end closed.


Position arms on body holding on to the egg and sew to body.


Hair: (make 6)
You will be changing color, so you might want to join your rows.
With medium pink, 4 sc in magic circle (4)
Row 1: sc next, 2 sc next, around (6)
Row 2-5: sc around (6)
Row 6: change to light pink, sc around (6)
Row 7: sc around (6)
Row 8, dec over next 2, sc next 4 (5)
Row 9-10: sc around (5)
FO  Flatten top and sew closed.

Once all six have been completed arrange three on each side of the body between the fifth and sixth rows from the top and sew on. Light pink on top.


Tail:
With light pink, 4 sc in magic circle (4)
Row 1: sc next, 2 sc next, around (6)
Row 2: sc next 2, 2 sc next, around (8)
Row 3: sc next 3, 2 sc next, around (10)
Row 4: sc next 4, 2 sc next, around (12)
Row 5-5: sc around (12)
Row 7: sc next 3, 2 sc next, around (15)
Row 8-9: sc around (15)
FO  Stuff tail and sew to body.


Finish: Cut two very small ovals out of white felt for eyes. Either cut two smaller ovals out of black felt for pupils or use the marker to draw on the pupils. Glue eyes to body. Embroider the mouth and small line on face with black yarn.


Chansey and Pokemon © Nintendo
 

This is my own original pattern. Please do not sell this pattern or the products created from this pattern. Please do not modify my pattern and call it your own. If you would like to place my pattern on another site, please feel free to provide a link.

Monday, September 2, 2013

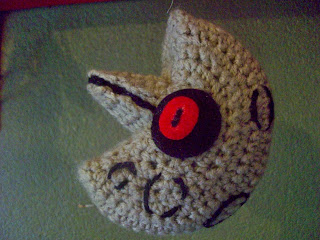
Lunatone

COMPLETED: 96 GOAL: 649?


Materials: grey-brown and black yarn, black and red felt, polyfil, crochet hook 'F', craft glue
 
 
Body:
With grey-brown, 6 sc in magic circle (6)
Row 1: 2 sc next 5, ch 1, turn (10)
Row 2: 2 sc next, sc next 8, 2 sc next, ch 1, turn (12)
Row 3: sc next, 2 sc next, across, ch 1, turn (18)
Row 4: sc next 5, 2 sc next, across, ch 1, turn (21)
Row 5: sc next 2, 2 sc next, across, ch 1, turn (28)
Row 6: sc next 3, 2 sc next, across, ch 1, turn (35)
Row 7: *sc next 7, 2 sc next* 3 times, sc next 5, ch 1, turn (38)
Row 8: sc across (38)
Row 9: sl st next 2, sc next 34, sl st next, ch 1, turn (37)
Row 10: skip 1st sc, sl st next, 2 sc next, sc next 32, sl st next 2, ch 1, turn (37)
Row 11: skip 1st sc, sl st next, 2 sc next, sc next 32, sl st next 2, ch 2, turn (37)
Row 12: sc 2nd ch from hook, sc next 37, ch 2, turn (38)
Row 13: sc 2nd ch from hook, sc next 37, ch 1, turn (38)
Row 14: *sc next 9, dec over next 2* 3 times, sc next 5, ch 1, turn (35)
Row 15: sc next 3, dec over next 2, across, ch 1, turn (28)
Row 16: sc next 2, dec over next 2, across, ch 1, turn (21)
Row 17: sc next 5, dec over next 2, across, ch 1, turn (18)
Row 18: sc next, dec over next 2, across, ch 1, turn (12)
Row 19: sc next 4, dec over next 2, across, ch 1, turn (10)
Row 20: sc next, *dec over next 2* 4 times, sc next (6)
FO
 
Fold row 9 towards row 11 on each side of the opening to form two darts. Sew the darts closed. Turn the body inside out.
 
 
Wedge:
With grey-brown, ch 3
Row 1: sc 2nd ch from hook and next, ch 1, turn (2)
Row 2: 2 sc next, sc next, ch 1, turn (3)
Row 3: 2 sc next, sc next 2, ch 1, turn (4)
Row 4: sc across, ch 1, turn (4)
Row 5: 2 sc next, sc next 3, ch 1, turn (5)
Row 6: sc across (5)
Row 7: 2 sc next, sc next 4, ch 1, turn (6)
Row 8-9: sc across, ch 1, turn (6)
Row 10: skip 1st sc, sc next 5, ch 1, turn (5)
Row 11: sc across (5)
Row 12: sc next 3, dec over next 2, ch 1, turn (4)
Row 13: sc across (4)
Row 14: skip 1st sc, sc next 3, ch 1, turn (3)
Row 15: skip 1st sc, sc next 2 (2)
FO
 
 
Cut a piece of cardboard the shape of the wedge. Begin to sew the wedge to the body opening. Place the cardboard inside up next to the wedge and begin to stuff the moon. As you continue to stuff the moon, the cardboard will stay in place. Finish sewing.
 
 
Nose:
(make 4)
With grey-brown, ch 4
Row 1: sc 2nd ch from hook and next 2, ch 1, turn (3)
Row 2: sc across, ch 1, turn (3)
Row 3: skip 1st sc, sc next 2, ch 1, turn (2)
Row 4: sc across, ch 1, turn (2)
Row 5: skip 1st sc, sc nexy, ch 1, turn (1)
Row 6: sc (1)
FO
 
 
Take 2 pieces and sew together. These will form the top and bottom of the nose. Cut two pieces of cardboard in the triangle shape you have just created. Fold pieces in half.
 
 
(make 1)
With black, ch 6
Row 1: sc 2nd ch from hook and next 4, ch 1, turn (5)
Row 2: sc across, ch 1, turn (5)
Row 3: skip 1st sc, sc next 4, ch 1, turn (4)
Row 4: skip 1st sc, sc next 3, ch 1, turn (3)
Row 5: skip 1st sc, sc next 2, ch 1, turn (2)
Row 6: dec over next 2 (1)
FO
 
 
Sew the black piece to the top on the left and right sides, leaving the bottom open. Sew the bottom to the other side of the black piece on the left and right sides, leaving the bottom open. Slide pieces of cardboard inside nose. Add a small amount of stuffing to create the peaks on the top and bottom of the nose. Sew the nose to body.
 
 
Finish: Cut two large circles out of black felt for eyes and two smaller ovals out of red felt for pupils. Use a permanent marker or cut two smaller ovals out of black felt for highlights. Glue the eyes together and then glue to body. With black yarn embroider the ovals around the body. See the pictures for placement. Notice that the ovals are not full, but are dashed.
 
 
Lunatone and Pokemon © Nintendo
 

This is my own original pattern. Please do not sell this pattern or the products created from this pattern. Please do not modify my pattern and call it your own. If you would like to place my pattern on another site, please feel free to provide a link.